一、 基础概念
Ansible发布于2012年,当年就被评为开源项目top10。基于python语言研发,部署简单
1. 架构
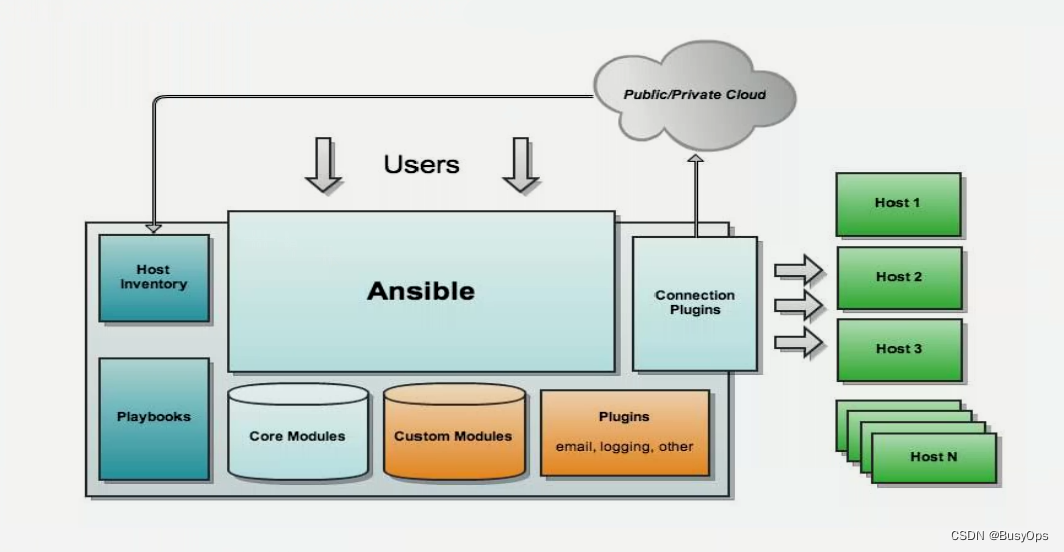
- Ansible:基础框架核心模块
- Core modules:核心模块,完成最基本的系统配置、管理等相关功能
- Custom modules:自定义模块,支持市面上大部分编程语言来开发模块
- Plugins:可以基于插件方式完成额外的功能扩展
connection plugins:链接插件,主要功能是链接各被管理的主机
host inventory:主机清单,定义被管理主机
playbooks:任务清单
|
2. 特性
- 平缓的学习曲线(Minimal Learning curve,auditability)
- No bootstrapping:无需用到bootstrapping功能
- No DAG ordering,Fails Fast:非有向无环图形式,快速失败机制
- No Agent、No Server
- No additional PKI:不依赖于额外的ssl服务
- Modules in any language:高度模块化,通过调用特性的模块完成特定任务
- YAML:基于yaml模板语言文件来完成批量任务的模板化
- ssh by default
- Strong multi-tier solution:强大的多层的解决方案
3. 运维工具分类
- 有agent:需要在每个被管理的节点上安装代理工具,这个代理工具能够跟管控端进行通信,管控端可以向代理下达指令,由代理进程在被管理节点本地完成某些管理操作
- 无agent(agentless):无agent的管理工具,一般通过ssh管理
4. 幂等性
同样的配置文件,所需要执行的操作,运行多少遍的结果都是一样的
二、安装及生成文件
1. 安装
因为ansible被收录于EPEL源,先安装EPEL源,再安装ansible
- EPEL源:
yum -y install epel-release
- ansible:
yum install ansible -y
2. 配置文件
/etc/ansible/ansible.cfg:主配置文件/etc/ansible/hosts:主机清单文件/etc/ansible/roles:角色配置文件/usr/bin/ansible:主程序/usr/bin/ansible-playbook:运行playbook的命令/usr/bin/ansible-galaxy:下载或上传优秀代码或Roles
三、命令
1. ansible命令
命令格式:ansible <host-pattern> [-f #] [-m module_name] [-a args]
option:
	-f #:每一批管理几台,默认为5
	-m m_name:调用哪个模块做管理操作,默认为command模块
	-a arg:指定模块特有的参数
	-i file:指明主机清单文件
	-k:如果不基于秘钥验证,每一次登录的密码

user模块
	name=:指明用户名称
	state={present|absent}:present为创建,absent为删除

cron模块:向每个主机分发定期任务
	day=:
	name=:cron任务的描述
	state={present|absent}:present为创建,absent为删除
	user=:以哪个用户运行
	job=:指明执行哪个命令
	disabled=:启用或禁用任务

copy模块:复制文件的模块
	dest=:指定放在目标主机的绝对路径
	src=:指明本地路径,默认可递归复制
	mode=:复制后直接指定权限
	content=:直接写明内容,在远程生成
	follow=:如果复制的文件中包含链接文件,还要将源文件一并复制
	示例:ansible all -m copy -a 'src=/etc/yum.repos.d/nginx.repo dest=/etc/yum.repos.d/nginx.repo'

fetch模块:把远程的文件抓取到本地,抓取到的文件会在本地保留原路径目录
	src:远程目标路径
	dest:本地路径

file:专门设置文件的属性
	state=:{directory|link|present|absent}
	src=:创建链接文件时,指明在远程主机的链接源文件
	path=:指定目标路径

ping:ping模块是专门测试主机存活状态
    示例:ansible all -m ping

yum:yum模块
    name=:指明程序包名称
    state={present|latest|absent}
    示例:ansible all -m yum -a 'name=nginx state=present'

service:管理服务的模块
	name=:指明服务名
	state={started|stopped|restaretd}:
	enabled={yes|no}:设置开机自启

shell:一些需要管道的复杂命令,需要使用此模块完成,使用方法同commond

script:把本地脚本在远程运行
	-a /path/to/somepath:直接指明本地脚本路径

setup:命令远程主机向ansible报告自身的属性信息
|
2. ansible-doc 命令
ansible-doc [option]
  -a:显示所有模块的文档
  -l:查看ansible支持的可用模块
  -s module_name:显示某个模块的在playbook中的具体用法
|
3. ansible-playbook 命令
命令格式:ansible HOST <file.yml> [option]
    -e vars:额外传递变量
    -u user:指定运行用户身份
	-C:检测运行,不是真正运行
	-t:指定执行tags段
|
4. ansible-galaxy 命令
此命令用于前往galaxy.ansible.com下载优秀角色文件
命令格式:ansible-galaxy <option> [file]
	install:拉取角色文件
	remove:删除
	list:列出本地角色文件
|
5. ansible-vault 命令
加密playbook的命令
ansible-vault [option] <file.yml>
	create:创建一个加密yml文件
	decrypt:解密
	encrypt:加密
	view:查看
	edit:编辑
	rekey:修改密码
|
四、Inventory
为了便捷的批量操作主机,可以在inventory文件中将主机归类定义。inventory文件遵循INI文件风格,中括号中的字符为组名,下方列出组内的各个主机,同一个主机可以同时归并到多个不同的组中。此外,当如若目标主机使用了非默认的SSH端口,可以在主机名称之后使用冒号加端口来标明。默认的inventory file为/etc/ansible/hosts
[webservers]
node1.busyops.com
node2.busyops.com

[dbservers]
db1.busyops.com
db2.busyops.com
db3.busyops.com

如果主机名称遵循相似的命名格式,可以使用列表的方式标识各主机

[webservers]
node[01:50].busyops.com

[databases]
db-[a:f].busyops.com
|
五、Playbooks
1. 基础指令
通过一个简单示例介绍几个基本的指令
- hosts: group
  remote_user: root
  tasks:
  - name: install httpd
    yum: name=httpd state=present

  - name: copy httpd cfg
    copy: src=/tmp/httpd.conf dest=/etc/httpd/conf/httpd.conf
|
hosts:用于指定要执行任务的主机,此处的group即为在Inventory文件中定义的主机名或主机组,如果想定义多个主机组可以使用冒号分割remote_user:指明执行任务以哪个用户的身份运行,示例中的remote_user指令是定义在hosts指令下的,其实这个指令也可以定义在task下,那么其生效范围也就仅针对某个tasktasks:用于指定需要执行的任务列表,列表中可以指定多个任务,ansible会指挥着全部主机完成第一个任务后,才会去执行第二个任务,运行过程中如果发生错误,可回滚的任务都将回滚。因此,只需更正playbook后再执行一次即可。在task中可以指定参数、执行模块,每个模块参数中都可以使用变量,每个task都应该有其name,用于playbook的执行结果输出,建议其内容尽可能可以清晰描述任务执行步骤,如果未提供name,则其action的结果将用于输出
name:指明此action的用途,功用之类的提示信息
moudle:command  :用于指定具体执行哪些操作,如示例中tasks1安装httpd,tasks2复制配置文件
|
2. notify和handlers
先看一个没有notify和handlers的示例
示例一:
- hosts: group
  remote_user: root
  tasks:
  - name: install httpd
    yum: name=httpd state=present

  - name: copy httpd cfg
    copy: src=/tmp/httpd.conf dest=/etc/httpd/conf/httpd.conf

  - name: start httpd
    service: name=httpd state=started
|
在这个示例中,如果这个playbook仅执行1次,那么其不会暴露什么问题。但是如果我们修改了配置文件(如修改了监听端口),再次执行这个playbook时,安装httpd和启动服务都会和第一次运行一样,而新的配置文件中修改的监听端口并不会生效,因其使用的还是老的配置文件。所以notify和handlers就是为了解决这个问题出现的
示例二:
- hosts: group
  remote_user: root
  tasks:
  - name: install httpd
    yum: name=httpd state=present

  - name: copy httpd cfg
    copy: src=/tmp/httpd.conf dest=/etc/httpd/conf/httpd.conf
    notify:
    - restart httpd
    -
  - name: start httpd
    service: name=httpd state=started

  handlers:
    - name: restart httpd
      service: name=httpd state=restarted
|
在第二个示例中,复制配置文件的task新增了notify指令,作用为一旦发现这个task状态为change时,就通知给相应的handlers,接着在最后定义相应的handlers,注意notify调用的名称一定要和handlers的name相吻合才行。通过notify和handlers就保证了当某配置改变时,自动去重启服务
3. vars
变量名仅能由字母、数字和下划线组成,且只能以字母开头
(1)facts
由正在通信的远程目标主机发回的信息,这些信息被保存在ansible变量中,要获取指定的远程主机所支持的facts可使用ansible <HOST> -m setup查看
(2)通过命令行传递变量
在运行playbook时通过命令行传递变量给playbook:ansible-playbook test.yml --extra-vars "hosts=www user=busyops",那么通过命令行传递的变量可以在运行playbook是直接进行调用
(3)主机变量
为每个主机定义不同变量,只需要在主机名称后跟变量即可,需要在inventory中定义
[web_server]
node1.cluster.com http_port=80
node2.cluster.com http_port=8080
|
(4)组变量
赋值给组内的所有主机,组内所有主机都可以在playbook中调用。注意vars为组变量固定关键字
[web_server]
node1.cluster.com
node2.cluster.com

[web_server:vars]
ntp_server=ntp1.aliyun.com
port=80
|
(5)组变量嵌套
组1:
  [httpd_server]
  httpd1.cluster.com
  httpd2.cluster.com

组2:
  [nginx_server]
  nginx1.cluster.com
  nginx2.cluster.com

组嵌套固定格式:
  [web_servers:clildren]
  nginx_server
  httpd_server

指定组变量:
  [web_servers]
  name=value
  name=value
|
(6) 直接指定
直接在playbook中指定需要用到的变量
- hosts: group
  remote_user: root
  vars:
  - pkg: httpd
  - srv: httpd
  tasks:
  - name: install httpd
    yum: name={{ pkg }} state=present

  - name: copy httpd cfg
    copy: src=/tmp/httpd.conf dest=/etc/httpd/conf/httpd.conf

  - name: start httpd
    service: name={{ srv }} state=started
|
定义的用于此hosts指定主机用到的变量,如示例所示定义了两个变量。后面调用时可以使用一组花括号进行调用{{ VARS }}
4. 条件测试
在playbook实现条件测试需要使用when关键字,见下方示例
- hosts: group
  remote_user: root
  tasks:
  - name: install httpd
    yum: name=httpd state=present
    when: ansible_default_ipv4.address == "192.168.60.110"
|
此示例中利用ansible的内建变量判断当ip地址相同时则对其安装httpd。需要注意ansible的部分内建变量存在层级关系,引用时需要注意格式,上方示例中为一种引用方式,下方为另一种子变量的引用方式
- hosts: group
  remote_user: root
  tasks:
  - name: install httpd
    yum: name=httpd state=present
    when: ansible_default_ipv4[ "address" ] == "192.168.60.110"
|
5. 迭代
当有需要重复性的任务时,可以使用迭代机制,其使用格式为将需要迭代的内容定义为item变量引用,并通过with_items语句来指明迭代的元素列表即可,如下方示例
- hosts: group
  remote_user: root
  tasks:
  - name: create user
    user: name={{ item }} state=present groups=wheel
    with_items:
      - guojing
      - huangrong

  - name: create user2
    user: name={{ item.name}} state=present groups={{ item.groups }}
    with_items:
      - { name: 'yangguo', groups: 'wheel' }
      - { name: 'xiaolongnv', groups: 'root' }
|
此示例中展示了两种列表迭代方式完成用户创建
6. 模板
如果需要为不同的主机提供不同的配置文件,就需要用到模板模块,示例如下
(1)首先在主机清单文件中为不同的主机设置不同的主机变量

vim /etc/ansible/hosts
[group]
192.168.60.110 http_port=80
192.168.60.120 http_port=8080

(2)接着在准备的配置文件中将对应的值修改为变量名称,以httpd配置文件为例,修改其中的监听端口及服务器名称
vim /etc/ansible/templates/httpd.conf
Listen {{ http_port }}
ServerName {{ ansible_fqdn }}

(3) 最后在playbook中调用template模块,这样template模块会自动扫描文件中的变量,替换为主机清单中的变量值后复制至各个主机
- hosts: group
  remote_user: root
  tasks:
  - name: install httpd
    yum: name=httpd state=present

  - name: copy conf
    template: src=/tmp/httpd.conf dest=/etc/httpd/conf/httpd.conf
|
模板中还可以实现算数运算
{{ A + B }}:加法,如果两者是字符串则会变成字符串拼接{{ A - B }}:减法{{ A / B }}:除法,返回值是一个浮点数。如{{ 1 / 2 }}结果为0.5{{ A // B }}:除法,返回值是一个整数。如{{ 13 // 7 }}结果为1{{ A % B }}:取模运算{{ A * B }}:乘法,但如果想将一个字符串重复多次也可以使用{{ 'A' *10 }},则会替换为10个字符A{{ A ** B }}:乘方运算
7. 标签
多次运行同一个playbook的时候,如果不需要将全部任务都执行一次,仅希望部分任务运行,即需用到tags模块
- hosts: group
  remote_user: root
  tasks:
  - name: install httpd
    yum: name=httpd state=present

  - name: copy conf
    template: src=/tmp/httpd.conf dest=/etc/httpd/conf/httpd.conf
    tags:
    - conf
|
定义好tags,在运行此playbook时需使用命令]# ansible-playbook httpd2.yaml --tags="conf",这样就可以保证仅复制文件的task运行而不运行安装httpd
8. 其他
如果有些操作执行时出错,但最终结果又能满足我们的意愿,可手动指定退出状态码
shell: /usr/bin/command || /bin/true
如果某个任务失败了,还想继续后续的操作可使用
innore_errors:True
六、Roles
roles通过分别将变量、文件、任务、模块及处理器放置于单独的目录中,实现不同的主机可以通过include指令来引用它们的一种机制,一般用于主机构建服务或守护进程的场景中。使用roles必须严格创建目录层次结构,接着ansible会自动装载变量文件、tasks以及handlers等
1. Roles层级结构
- 需要在roles目录中,分别创建以各角色名称命名的目录,如web、db,此处为webserver
- 在每个角色目录下分别创建以模块命名的目录
[root@node1 roles]# tree /etc/ansible/roles/
/etc/ansible/roles/
├── webserver
│   ├── default
│   ├── files
│   │   └── index.html
│   ├── handlers
│   │   └── main.yml
│   ├── meta
│   ├── tasks
│   │   └── main.yml
│   ├── templates
│   │   └── test.conf.j2
│   └── vars
│       └── main.yml
└── webserver.yml

8 directories, 6 files
|
2. 文件内容及功用
tasks/:每个需要完成的任务都需要在此目录中进行定义,至少应包含一个名为main.yml的文件
]# cat tasks/main.yml
- name: install nginx
  yum: name=nginx state=present

- name: copy conf file
  template: src=test.conf.j2 dest=/etc/nginx/conf.d/test.conf
  notify:
  - reload nginx
  tags:
  - nginx_conf

- name: mkdir nginx work dir
  file: dest={{ nginx_dir }} state=directory

- name: copy nginx index
  copy: src=index.html dest={{ nginx_dir }}
  tags:
  - nginx_index

- name: start service
  service: name=nginx state=started enabled=true
|
handlers:如果定义的触发器,则需要在此目录中进行定义,至少包含一个main.yml
]# cat handlers/main.yml
- name: reload nginx
  service: name=nginx state=reloaded
|
]# cat templates/test.conf.j2
server {
    listen {{ nginx_port }};
    server_name {{ ansible_fqdn }};
    location / {
        root {{ nginx_dir }};
    }
}
|
]# cat vars/main.yml
nginx_dir: /data/nginx/
nginx_port: 8080
|
files:使用file模块或copy模块时,默认的文件搜索路径
]# cat webserver/files/index.html
<h1> welcome nginx <h1>
|
roles/:此目录为ansible的工作目录,如果想更改的话可以在ansible的主配文件中进行修改。
 ]# cat webserver.yml
- hosts: webserver
  remote_user: root
  roles:
  - webserver
|
meta:至少包含一个main.yml文件,用于此角色的特殊设定及其依赖关系default:当前角色设定默认变量时,使用此目录,至少包含一个main.yml文件
 某信
某信 某付宝
某付宝